Retractable awnings are popular standard equipment on the majority of RVs. They come in many styles, colors, and lengths depending on RV model. Some larger rigs even have two or more awnings. This article covers everything you need to know for RV awning maintenance, repairs, or replacement. We also discuss everything from choosing the right cleaning products to DIY repairs and replacing the awning fabric yourself.
But first, let’s review the basics about RV awnings. The two most common types of RV awnings on rigs today are:
- Side-frame awnings, with vertical frame supports mounted down the side of the RV.
- The other type are lateral “floating” arm awnings with less frame structure. They utilize horizontal awning support arms mounted only near the top of the RV.
RV awnings are either manually extended and retracted using a strap or pole, or electrically operated at the push of a button (activated by a motor at one end of the awning roller tube). There is debate as to which frame and operating style is better. But, we won’t open that RVing can-of-worms here!
RV Awnings Provide Many Benefits
RVers love their awnings for several reasons:
- RV awnings provide comfort and shade from the hot summer sun.
- They can provide some protection from light rain.
- Awnings maximize your outdoor campsite area, providing another defined living space for relaxing and entertaining.
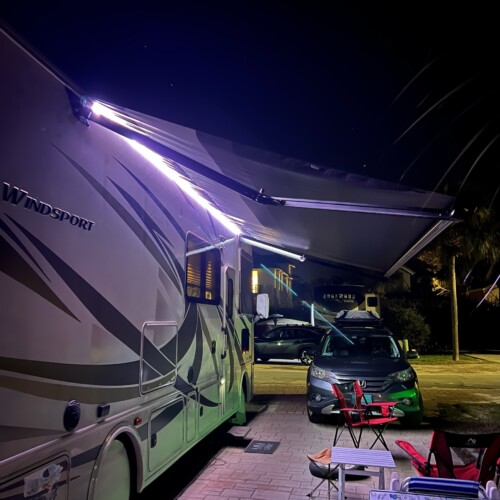
- RV awnings are handy for stringing patio lights, as well as creating “down-lighting” from permanently affixed LED awning lights.
Regardless of RV awning type or size, and how you use it, they all have something in common…the need for regular maintenance, repairs, and eventually, replacement. Let’s take a look at each of these aspects.
Maintenance and Cleaning for RV Awnings
“An ounce of prevention is worth a pound of cure.” That old saying also applies to your RV awning. To extend the life of your awning, and keep it looking good, regular maintenance and cleaning is necessary.
Easy Maintenance Steps You Can Do
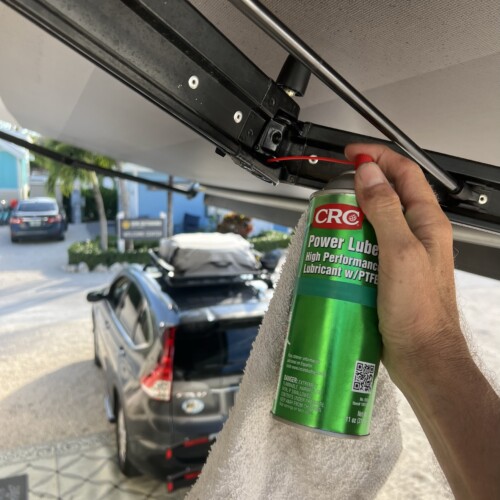
Fortunately, there is not a lot involved with day-to-day maintenance of RV awnings and frames. Simple tools like an allen wrench, socket set, and proper screwdrivers are all that you need. A good silicone dry-lube spray is also recommended.
- Inspect all of the bolts, screws and other fasteners that hold your awning together and attached to your RV. Do this periodically, tightening them as needed. As your RV rolls down the highway, absorbing every bump, crack, and pothole, things can loosen up over time.
- Adjust your RV awning properly. Many awnings have adjustment screws and bolts that allow you to set preferred angles for more or less shade. They can also be used to tilt one side of the awning down to better shed rainwater.
👉 Tip: Angle your awning toward the back of your RV so that rain water and AC unit condensation is directed back and away from your camper patio and doorway. This can also prevent your awning from collapsing under the weight of pooled rainwater during a storm.
- Lubricate all moving parts of the RV awning frame. Use a silicone-based dry lubricant on all hinges, pins, knuckle joints, and struts of your awning frame. You’ll want to use the dry lubricant rather than a wet lubricant since the awning frame is exposed to dust and grime as you travel down the road.
RV Awning Cleaning Tips
Keeping your RV awning fabric clean and mildew-resistant is very important. The better you keep the fabric clean and dry, the longer it will last. And it will look nicer, too!
View any online RVing forum or Facebook group and you are bound to see a zillion opinions on what works best to clean RV awnings. We don’t have room to list them all here, but we do have a few general care and cleaning tips to recommend:
- Avoid rolling in your awning when it is wet to prevent mold and mildew stains. If you must roll it up wet, at the next opportunity, extend the awning to let it dry before re-rolling it.
- Avoid using bleach or bleach-based cleaning products. Sure, it cleans well. But, bleach is very strong and can cause premature deterioration of awning materials, especially seam stitching.
- Rinse thoroughly with a gentle hose stream, especially if you use stronger cleaning products. Then, let your awning dry to remove all moisture before retracting it.
- Use a long-handled soft brush to scrub dirt. Make sure to wear eye protection while looking up and scrubbing the awning. Scrub both the top and underside of the awning.
- We’ve observed RVers achieve good cleaning results with any of these methods:
- Mild soap or dish soap and water – Most gentle for awning fabric.
- White vinegar and water mixture – Equal parts of each.
- Magic Eraser
- LA’s Totally Awesome Cleaner – Dilute with warm water and rinse well.
- B.E.S.T. Awning Cleaner – Also contains a UV protectant.
- Specific RV awning cleaners by CAMCO, Thetford, Dicor, and other name brand manufacturers.
Easy DIY RV Awning Repairs to Save You Time & Money
Unfortunately, your RV awning fabric can be damaged all too easily. As tough as the material is, it’s no match for a sharp branch plummeting down from the trees above. The fabric can also wear thin in spots or tear. Seam stitching can deteriorate after years of exposure to high humidity, high temperature summer sun, and harsh weather elements.
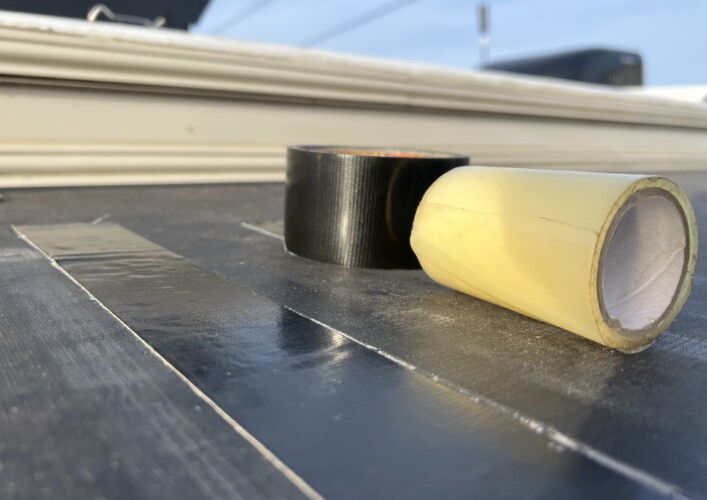
With a little DIY effort, you can often easily repair your awning, putting off the expense and hassle of replacement. A commonly used item for small to medium sized holes and tears is repair tape. There are many different tape products suitable for RV awning repairs:
- Incom Manufacturing Awning Repair Tape
- Tear-Aid tape
- FlexSeal tape
- Eternabond
- Gorilla tape
- Sail/spinnaker tape
What you choose to use for your awning repair depends on the nature of the damage and what is available where you are.
An important first step is cleaning the repair area well to ensure good adhesion of the tape or patch. We recommend placing the patch both on top and on the bottom of the damaged area.
You’ll want to rub the repair patch firmly on both sides to create a strong bond. If the repair is on an edge of the awning, fold the tape or patch over the edge to help it stay secure longer.
👉 Tip: Make sure your tape or patch doesn’t have square corners. Cut the corners in a radius for better long-term adhesion. Square corners have a tendency to more easily lift up and peel, shortening the life of your RV awning repair.
Replacing RV Awning Fabric – Yes, You Can Do It!
We hate to think about it, I know, but sometimes the only thing to do is replace your RV awning fabric. Either a catastrophic event destroys it, or it has simply worn out over its useful life. In these cases, repair isn’t feasible. It’s time to replace.
Ordering DIY Replacement Awning Fabric
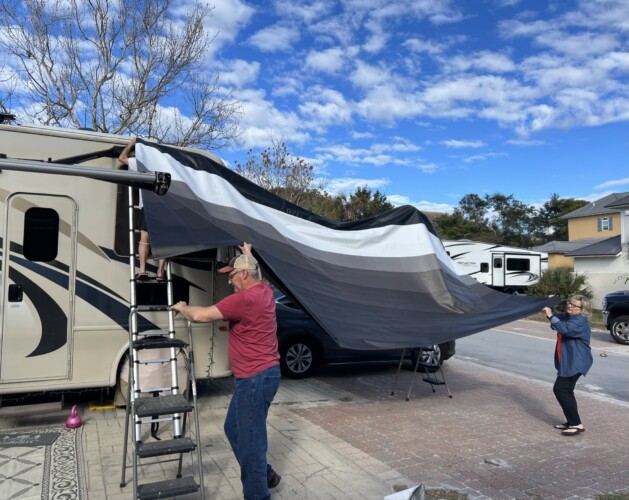
Fortunately, you have the option of purchasing new awning fabric custom fitted to your RV. We’ve replaced our rig’s awning fabric and, with helpers, it’s not too hard of a DIY project.
Along with your original RV awning manufacturer, three good sources of RV awning replacement fabric include: Carefree of Colorado, ShadePro, and Tough Top Awnings. Each has an informative website and with easy online and phone ordering.
Ideally, you should order awning fabric that is heavy duty and offers the best UV protection that your budget allows. Pricing varies…a lot. So, be sure to shop around.
👉 Tip: Ordering your awning fabric online may seem easiest. But, we recommend also calling the company to make absolutely sure you are ordering the correct style and dimensions for your specific RV application. It’s quite the fiasco to receive new awning fabric and happily begin installing it, only to discover it is the wrong size or style!
Installing Your Replacement Awning Fabric
Given the variety of RV awning types and roller tube configurations, we can’t give you specific instructions. You should refer to your awning owner’s manual to get the manufacturer’s guidelines on fabric replacement procedures. And, of course, there are YouTube videos that can show you the steps for your RV’s make and model of awning. Reaching out to fellow RVers in forums and groups can also provide helpful tips.
However, to give you a general idea of the RV awning fabric replacement process, the steps are usually similar to these:
- You’ll gather a team. Having two to four helpers will make the job go much easier. Trust me on this! A step ladder, or two, is also needed.
- Release tension on the awning fabric, frame, and roller tube (some are spring-loaded).
- After removing set-screws that hold the awning edges in the channels at the top of the RV and in the roller tube, you and your helpers will slide the old awning fabric out of the channels (usually toward the front of the RV).
- Spray a silicone lubricant down each awning channel.
- You and your helpers will slide the new awning fabric into the upper and lower channels. Position it properly and secure it in the channels.
- Restore tension to the fabric, frame, and roller tube.
- Test for proper RV awning operation. Adjust fabric positioning as needed.
With helpers, the whole awning fabric replacement job can be done in a couple of hours. As a DIY project, you can save money and possible loss of use of your RV if you otherwise needed to leave it at a shop.
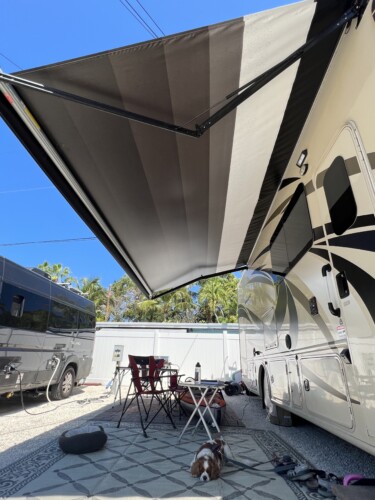
Now, Enjoy Your New RV Awning
There you have it! Proper care and maintenance of your RV awning can prolong it’s life and keep it functional. Now it’s time to roll out that awning, kick back on your campsite in the cool shade, and reeeelax!